SPC Tri-Core Click Installation Instructions

General Information 

All instructions and recommendations should be followed for a satisfactory installation. A minimum of a 48-hour acclimation period of the material is required prior to installation. The floor covering should be acclimated and installed in a climate-controlled environment with a temperature between 55 degrees and 85 degrees Fahrenheit, (13 degrees – 29 degrees Celsius) or average temperature of 70 degrees, (21.1 Celsius)

  • Post installation temperature range is between -25- and 140-degrees F (-31.6°- 60°C).
  • Avoid exposure to direct sunlight for prolonged periods, doing so may result in discoloration. During peak sunlight hours, the use of the drapes or blinds is recommended. Excess temperature due to direct sunlight can result in thermal expansion and UV fading.
  • Install product after all other trades have completed work that could damage the flooring. If cabinets are to be installed on top of the flooring (including islands), that area of material must be fully adhered to the subfloor (including an additional 2’ft beyond the cabinets and islands).
  • To minimize shade variation, mix and install planks from several cartons. Inspect all planks for damage before installing. If you have any concerns about the product fit or finish, SAR Floors Technical support. Claims will not be accepted for flooring that has been cut to size and/or installed.
  • Use cementations patching and leveling compounds that meet or exceed maximum moisture level and pH requirements. Use of gypsum-based patching and/or leveling compounds which contain Portland or high alumina cement and meet or exceed the compressive strength of 3,000 psi are acceptable.
  • Installation Methods: Floating (on, above or below grade) / Glue Down (on, above or below grade)
  • A minimum expansion space of 1/4” (6.35 mm) around the perimeter from the wall is required. For installation in areas larger than 50’x 50’, 2500 sq. ft. provide a minimum expansion space of 1/2” (12.7 mm) around the
  • For rooms over 25 ft. (7.6m) wide or over 40 ft. long, an additional expansion joint must be inserted. Expansion joints are also required in doorways, and between adjoining rooms or areas where adjacent flooring is installed. Use a T-molding to cover the expansion joint.
  • This flooring is waterproof and reliably secures the flooring panels on all four However, excessive moisture
  • This flooring is waterproof and reliably secures the flooring panels on all four sides. However, excessive moisture in the subfloor could promote mold, mildew, and other moisture related issues like the trapping of moisture emissions under the flooring, which may contribute to an unhealthy indoor environment.
  • A 6mil poly-film vapor barrier is REQUIRED on ALL Concrete Floors.  Failure to do this will void your manufacturers warranty.
  • A second underlayment is allowed under any currently sold SPC Product with attached underlayment in a residential application. If installed over a second underlayment, this underlayment cannot be greater than 3 mm thick. IIC. (ASTM E492-09) and STC (ASTM E90-09) lab testing on certain SPC products tested with and without a second layer of underlayment, to date, does not indicate that a second underlayment will provide additional acoustic benefit.
  • Warranty Exclusion: Environments with casters, wheelchairs, and other rolling loads are not compatible with click, floating floors due to the unusual characteristics of this type of wheel traffic. In addition, chair legs must have chair pads applied and maintained.

Subfloor information

All subfloors must be clean, flat, dry and structurally sound. The correct preparation of the subfloor is a major part of a successful installation. Subfloor must be flat – 3/16" in 10' or 1/8" in 6'.

Wood Subfloors

Do not install material over wood subfloors that lay directly on concrete or over dimensional lumber or plywood used over concrete.

Refer to ASTM F1482 for panel underlayment recommendations.

  • Do not apply sheet plastic over wood
  • Basements and crawl spaces must be dry. Use of a 6 mil black polyethylene is required to cover 100% of the crawl space earth. Crawl space clearance from ground to underside of joist is to be no less than 18” and perimeter vent spacing should be equal to 1.5% of the total square footage of the crawl space area to provide cross ventilation. Where necessary, local regulations prevail.
  • All other subfloors - Plywood, OSB, particleboard, chipboard, wafer board, etc. must be structurally sound and must be installed following their manufacturer’s recommendations. Local building codes may only establish minimum requirements of the flooring system and may not provide adequate rigidity and support for proper installation and performance. If needed add an additional layer of APA rated underlayment, fasten and secure according to the underlayment manufacturer’s recommendations.
  • Resilient flooring is not recommended directly over fire-retardant treated plywood or preservative treated An additional layer of APA rated 1/4" thick underlayment should be installed.

Concrete Subfloors

New and existing concrete subfloors should meet the guidelines of the latest edition of ACI 302 and ASTM F710, “Standard practice for preparing concrete floors to receive resilient flooring”, available from the American Society for testing and materials, 100 BARR HARBOR DRIVE, WEST CONSHOHOCKEN, PA 19428; 610-832-9585;

HTTP://www.astm.org.

  • Floors shall be smooth, permanently dry, clean, and free all foreign material such as dust, wax, solvents, paint, grease, oils, and old adhesive residue. The surface must be hard and dense, and free from powder or flaking.
  • New concrete slabs must be Maximum moisture level per CaCl test method is 8 lbs. per 1000 in 24 hr. Maximum

level for ASTM 2170 In-situ Relative humidity test method - 90%.

  • Do not install over concrete with a history of high moisture or hydrostatic conditions. Excessive moisture in the sub- floor could promote mold, mildew, and other moisture related issues like the trapping of moisture emissions under the flooring, which may contribute to an unhealthy indoor environment. SAR Floors does not warrant nor is responsible for damage to floor covering due to moisture related issues.
  • PH level of concrete should be between 7-10.
  • The final responsibility for determining if the concrete is dry enough for installation of the flooring lies with the floor covering Installer.

NOTE: IT MAY NOT BE THE FLOOR COVERING INSTALLER'S RESPONSIBILITY TO CONDUCT THESE TESTS. IT IS, HOWEV- ER, THE FLOOR COVERING INSTALLER'S RESPONSIBILITY TO MAKE SURE THESE TESTS HAVE BEEN CONDUCTED, AND THAT THE RESULTS ARE ACCEPTABLE PRIOR TO INSTALLING THE FLOOR COVERING. WHEN MOISTURE TESTS ARE CONDUCTED, IT INDICATES THE CONDITIONS ONLY AT THE TIME OF THE TEST.

Lightweight Concrete

All recommendations and guarantees as to the suitability and performance of lightweight concrete under resilient flooring are the responsibility of the lightweight concrete manufacturer. The installer of the lightweight product may be required to be authorized or certified by the manufacturer. Correct on-site mixing ratios and properly functioning pumping equipment are critical. To ensure proper mixture, slump testing is recommended.

  • Lightweight aggregate concretes having dry densities greater than 90 lbs. per cubic foot may be acceptable under resilient flooring.
  • Concrete slabs with heavy static and/or dynamic loads should be designed with higher strengths and densities to support such
  • Surface must be permanently dry, clean, smooth, free of all dust, and structurally
  • Perform Bond testing to determine compatibility of adhesive to the
  • Three internal relative humidity tests should be conducted for areas up to 1000 One additional test, for each additional 1000 SF.

Radiant Heat: Hydronic only - Radiant heat components must have a minimum of 1/2" separation from the product. This is the only type of radiant heat system that is approved. Radiant heat system must be on and operational for at least 2 weeks prior to installation to reduce residual moisture within the concrete. Three days prior to installation lower the temperature to 65 degrees, after installation gradually increase the temperature in increments of 5° F to avoid overheating. Maximum operating temperature should never exceed 85°F. Use of an in-floor temperature sensor is recommended to avoid overheating

Existing Floor Coverings

Flooring can be installed over most existing hard-surface floor coverings, provided that the existing floor surface is fully adhered, clean, flat dry structurally sound and free of deflection.

  • Existing sheet vinyl floors should not be heavily cushioned and not exceed more than one layer in thickness. Soft underlayment and soft substrates will compromise the product's locking ability as well as diminish its indentation resistance.
  • Installation is NOT allowed over any type of carpet.
  • Do NOT install over wood floors adhered to concrete.
  • Never use solvents or citrus adhesive removers to remove old adhesive Solvent residue left in and on the subfloor may affect the new floor covering.

Raised Access Panel Subfloors

  • Raised access panels must be stable, level, flat, free and clean of existing adhesives 24" x 24" panels are recom-

mended.

  • Over wood (variation of height) between of panels must not exceed 295” (0.75 mm)
  • Gaps between panels must not exceed 039” (1mm)
  • There should be no deflection of the individual panels – Concave less than 0295” (0.75 mm)
  • Flatness 1/8” in 10’
  • Stagger the flooring tiles/planks to overlap the access panels
  • Telegraphing of access panel seams may be visible and is not considered a product defect nor warranted by the flooring manufacturer.

If needed overlay the panels with a 1⁄4” (6 mm) plywood and properly fasten to the access panels prior to the installation of the floor covering. Prior to underlayment installation, repair any loose or unstable panels. Use the appropriate installation methods for the product

Installation

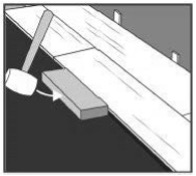
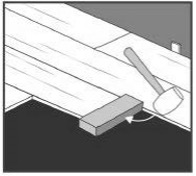
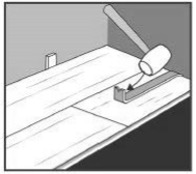
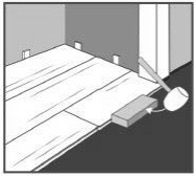
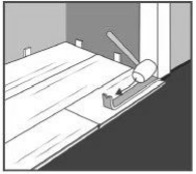
Tools: Tape Measure, Utility Knife, Jigsaw, Tapping Block or Rubber Mallet, Pull Bar, 1/4" Spacers, T-Square, Safety Glasses, Broom or Vacuum and, if necessary, tools for subfloor repair.

Floating Installation

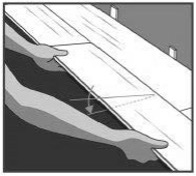
SPC plank flooring is designed to be installed utilizing the floating method. Proper expansion space 1/4” (6.35 mm) is required. For installation in areas larger than 50’x 50’, 2500 sq. ft. provide a minimum expansion space of 1/2” (12.7 mm) around the perimeter. Undercut all doorjambs. Do not fasten wall moldings and or transition strips to the planks.

Glue Down Installation

SPC products are approved for glue down installation over approved wood and concrete substrates. Follow adhesive label application instructions. Install flooring into wet adhesive. Maintain 1/4” (6.35 mm) perimeter expansion space. Refer to adhesive label for moisture limits of the adhesive. Roll flooring immediately after installation with a 100 lbs. 3‐section roller.

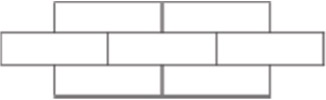
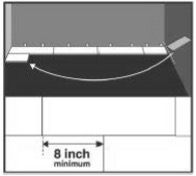
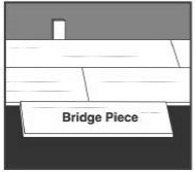
Tile patterns must be installed in a staggered (offset) brick pattern. Minimum 1/3 offset 1/2 offset is preferred.

Step 1
Begin installation working from left to right. Insert spacers at ends and edges where planks meet wall.
Step 2
Lock short end of plank by inserting tongue into groove at an angle and drop in place. Continue to end of first row.
Step 3
Use leftover plank from first row as starter for second row. There must beat least 20cm between plank end joints on adjacent rows. FOR TILE INSTALLATIONS: The distance between end joints should be equal to 30cm for proper appearance.
Step 4
Lock long edge of plank by inserting tongue into groove at an angle and drop in place. Slide plank toward end of previously installed plank until the tongue just touches the groove.
Step 5
IMPORTANT! Use hammer and tapping block to tap long edge of plank to ensure a tight fit. ANY GAPPING CAN COMPROMISE THE LOCKING SYSTEM!
Step 6
Attach a scrap piece of floor to bridge the gap between ends of planks.
Step 7
Tap end of plank with hammer and tapping block to lock ends of planks together. Remove bridge and continue towards wall until installing the final plank in the row. BE SURE TO TAP ON EDGE OF VINYL SO AS NOT TO DAMAGE LOCKING PROFILE.
Step 8
Use hammer and pull bar to lock final piece in row. Insert spacer at end of row. Continue installation to final row. Use hammer and pull bar to lock long edges of planks on final row.
Installing underneath door jambs
Step 1
Undercut space under door jamb to allow plank to slide freely. Tap long edge with hammer and tapping block to lock long edge.
Step 2
Use hammer and pull bar to lock short end of plank.

Completion

1. Protect all exposed edges of the flooring by installing wall molding and/or transition strips. Make sure that no plank will be secured in any way to the subfloor.

2. For wet areas such as bathrooms caulk the perimeter of the floor with a flexible silicone caulk.

3. Protect the finished flooring from exposure to direct sunlight to reduce fading and thermal expansion.

Radiant Heat:

SPC / LVP Over Radiant Heat:

Radiant Heating: Radiant-heated subfloor systems can be concrete, wood or a
combination of both.

The heating systems components must have a minimum of 1/2″ separation from the heating system to the flooring covering product. The system must be on and operational for at least 2 weeks prior to installation to reduce residual moisture. Three days prior to installation lower the temperature to 65 degrees. After installation, gradually increase the temperature in increments of 5° F to avoid overheating. Maximum operating temperature should never exceed 85°F. Use of an in-floor temperature sensor is recommended to avoid overheating. Contact the manufacturer of your radiant heating system for further recommendations.

Warning: Heating mats work very well under carpet, tile, and stone. However, we do not recommend having them placed directly underneath the Vinyl SPC or LVP floor. It is best to install Vinyl SPC flooring over hydro-based radiant heating systems.

LVP (dry-back, glue down) specific:

Use only recommended flooring adhesive over manufacturer’s recommended plywood substrate. The system must be on and operational for at least 2 weeks prior to installation to reduce residual moisture. Turn the heat off for 24 hours before and during installation, and 24 hours after installation when installing over radiant heated subfloors. Failure to turn the heat off may result in shortened working time of the adhesive.

Floor temperature must never exceed 85°F (30°C).

Failure to strictly follow adhesive manufacturer’s guidelines may result in failure and void warranty.

by:
© 2023 SAR Floors, all rights reserved. 
chevron-down
linkedin facebook pinterest youtube rss twitter instagram facebook-blank rss-blank linkedin-blank pinterest youtube twitter instagram